|
By
Wendy
Types of pond construction
Prefabricated
This is the simplest to do, you just dig a hole a little bigger than the unit.
Place a layer of sand down on the bottom, use this to level it, you want to have
the water level the same distance from the top all around.
When backfilling along the sides use water to ensure that it fills in all the
voids. Place edging rocks along the top and your all done.
Liners
These take a little more work, but they let you be more creative in the shape of
the pond.
DO NOT USE the rubber sheeting they use for roofing, it will release
petroleum products into the water and kill whatever aquatics you put in there.
The most durable liner is synthetic rubber (EPDM) 45 mil. There also is
Polyethylene 22 mil. When buying the liner you can either buy a precut rectangle
and then dig the hole to match it, or dig the hole first and calculate what size
liner you will need. Measure the length and width, to each dimension add 2 1/2
times the deepest part + 1 1/2 feet for the edging. After digging the hole,
smooth the dirt out removing rocks and roots, make sure the top edge of the pond
is level in all directions. Place a layer of sand down and lay the liner in and
smooth it out. Next add the water, as the water is filling the pond smooth and
adjust the liner making folds in it to fit the shape of the pond. After the pond
is filled you can trim the edging back, I recommend leaving at least 6" of
edging, place rocks on top to cover and hold the liner down, save a couple
pieces of the lining in case you have to patch a hole.
You can also make an aboveground pond with a wood frame or concrete blocks
Concrete
Pouring a concrete or spraying gunite requires reinforcing bars and wire mesh
and is best left to professionals.
The method I use is much like mortaring a stone wall or block wall to make the
floor and walls. After the concrete has cured for 2 weeks I apply 2 coats of a
waterproofing paint called "Dryloc". After waiting for the paint to cure you
fill the pond with water and let it sit 24 hours and then drain it. Refill it
and let it stand for 2 weeks this stabilizes the PH (by removing free lime),
then drain the water and refill and your all set. You can speed up this process
up by etching the concrete surface with a brush before it dries with muriatic
acid (2 parts acid 1 part water) until the concrete stops bubbling.
Ponds for
turtles
To deter predators you should make the pond so that the water is at least 18"
deep.
For turtles I like using the concrete type pond, besides being the most durable,
with the inside painted I can see what is going on all the time. With the dark
liners I find it hard to see the bottom unless the sun is directly overhead.
If you plan on keeping the turtles in the pond year round, make sure you make it
deep enough so that it doesn't freeze solid and provide a few inches of debris
on the bottom for the turtles to bury in when they hibernate.
If you want the turtles to stay in the pond, overhang the edge of the pond with
large flat rocks a couple of inches above the water level so they can't climb
out. Also you will need a overflow outlet to maintain this water level in case
of heavy rain, a short section of 1 1/4" PVC pipe through the wall works fine.
If you want them to be able to leave the pond, you will have to fence it in.
Some turtles are excellent climbers, I have see Red-Eared Sliders climb a
chain-link fence, a wood fence should have vertical slats. Also bury the bottom
of the fence 3" into the ground so they can't dig under it.
Filters/Pumps
Their are hundreds of different models and sizes that are available for ponds.
The filter you select should be based on the size of your pond and on what you
plan on having in it. A small pond (less than 200 gallons) can function will a
submersible filter that has the pump inside the unit. Above 200 gallons you
should be looking at an external bio-filter with only the pump in the water.
If your just going to have plants and a couple of small fish I would buy a
filter that is rated for your gallons as an absolute minimum, but if you plan on
adding more fish or turtles I recommend that your filter be rated for least
twice your ponds gallons.
To determine gallons Length x Width x Average depth x 7.5.
You want your filter to be a low maintenance item, the longer you can go without
disturbing a bio-filter for cleaning is what your looking for.
One of the more important components in a pond bio-filter is a prefilter. This
will eliminate the larger particles from reaching and clogging the media.
Remember you really can't control what your pump will send to the filter, rotten
leaves, worms, etc.... I use a wire screen tube over the intake of the pump to
grab the really big pieces but the amount of muck that does get sucked up and
collected by the prefilter is amazing.
To size the pump for an external filter, measure the surface area of the filter
media in square inches, multiple that by 2 or 3, that is the pump in gallons per
hour your looking for.
Now determine where the filter is going to be placed, measure the vertical
distance from the pump to the filter, that is your head loss. A 500gph pump
might only give you 300pgh at 3 feet. Generally pumps will list the gallons per
hour they will deliver at different heights right on the box, if not they do
inside with the manual.
REMEMBER any outdoor electrical appliance especially where water is
involved MUST be plugged into a GFI (ground fault interrupt) outlet.
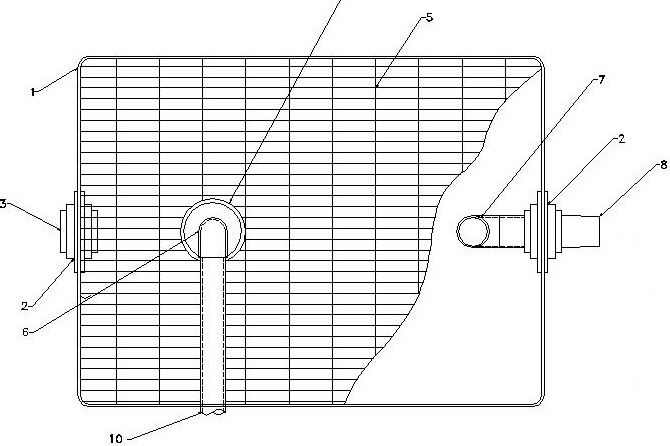
If you want to save some money you can make your own filter. Attached is a basic
diagram of the filter that I made and use both inside and outside.
You should check with your town or city building department, they might require
that your pond or yard be fenced in. Remember little kids are always are always
getting into something what you don't want is for them to be near your pond
without supervision.
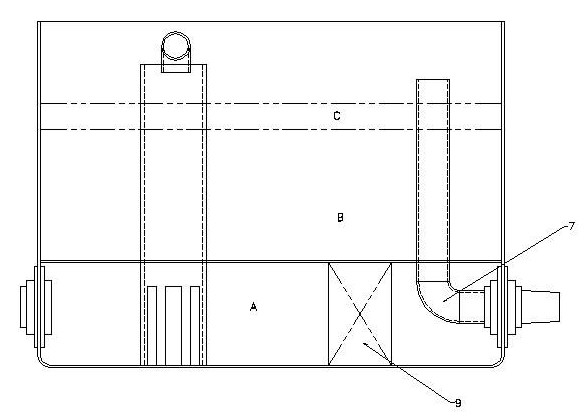
A. Settling Zone (About 2" deep)
B. Lava Rock (The type used in barbeques,
at least 6" deep)
C. 1/4" Diameter Stones (Minimum 2"
depth)
1. Tupperware Container
2. Bulkhead Fitting (I use the ones used on
swimming pools)
3. Drain Plug (Sold at pool stores also)
4. PVC Pipe (Slots cut in the bottom to
diffuse the flow)
5. Wire Fencing with openings 1" wide,
maximum (This covers the entire bottom)
6. PVC Elbow
7. PVC Overflow Pipe
8. Pool Hose Container (I use a pool hose
back to the pond)
9. Wire Support Blocks (3 or 4 will do. Try
not to block the water flow)
10. Feed Pipe from Pump
This filter design needs to run all the
time.
For a Pre-Filter, I use a nursery pro
sponge filter on the pump.
It takes about 3 weeks before the bacteria
starts to work.
Once a month I open the drain for 30
seconds with the pump still running the flush out any sediment that might be
there.
I didn't give any pipe sizes - that would
depend on the pump size and head loss to the filter.
Pond USA
|