|
and how not
to cook your turtle.
by Bob McNally
How To Find, Choose & Treat Driftwood
Let’s start
with what constitutes driftwood
For most folks, driftwood is any piece of wood that has
lost its bark. But how that wood lost its bark is what makes the difference
between which wood will work out in the long run. Wood that is collected from
the forest floor usually doesn’t work out well. A piece of wood that lays on the
forest floor for any length of time has lost it’s bark because a multitude of
insects and fungus wormed their way into the cambium layer just under the bark.
The cambium layer is the newest wood in the tree and is also the softest. Once
the cambium layer is devoured the bark is now detached from the wood. But,
because the wood is lying undisturbed on the forest floor, the bark remains in
place, creating the perfect cover for the next wave of wood devouring insects
and fungi. The fungi actually do more harm than the insects because they
permeate the wood, rendering it soft and utterly useless.
Wood that manages to fall into the water loses its bark a
little differently. The cambium layer breaks up rather quickly. In most
hardwoods it’s only about 1/8” thick or less. But in water, once the bark is
loose, the water washes it away. The dark hiding places that fungi need to do
their damage is gone. The only thing left to break down the wood is the erosive
effect of the water, which gives the wood its soft edges and polished
appearance. Exactly what we’re looking for in a piece of driftwood.
In the hunt for driftwood, I recommend using only water
borne driftwood. The rivers are the best source. They’re usually hundreds of
miles long and they’re usually lined with trees. The best places to start your
search are any cove. Dams, bridge abutments, and sharp turns in the river. You
can find driftwood on ocean beaches but it’s not as plentiful.
What to do to
your driftwood to make it safe
I’ve read suggestions ranging from boiling the wood, to
baking it in an oven, to giving it a salt bath, to bleach solutions, etc....
None of which are easy to pull off if you have a three foot piece of wood.
The first thing to do is thoroughly dry the wood.
Store the wood for at least two months in a dry, airy place (not
your attic; if there're any woodborer larvae or the like residing in the wood,
this is a good way to introduce the little vermin into your house!). Placing it
in direct sunshine once in a while will speed up the drying process. Some place
with low humidity will help. Well-dried wood is crucial for step two to work. I
also chisel away any bark and all soft spots. These soft spots are the result of
fungal breakdown, as in decomposition. We only want very dry, good solid wood to
work with.
Once I’m
satisfied the wood is dry, step two is to fumigate. I use the household flea
foggers sold in house wares store. I pile all of my dried wood into the tool
shed, which for me is usually a pick-up truck load. Block up all of the
openings with newspaper and use one can of fogger. The instructions on the
can will tell you that you can return to the room after two hours. I’m not
that trusting. I don’t go back into the shed for a couple of days. Even
though the toxins self-neutralizes in two hours, I give it a few weeks just
to be safe. After the three to four months, between drying, fumigation and
neutralizing, I’ve got driftwood I can almost trust. There’s more to be done
later in the final cleaning process.
Warning:
The following represents our best lay understanding of safety
information pertinent to defoggers with the active ingredient
Tetramethrin for use in
driftwood preparation for turtle enclosures, provided in good faith. We do
not & cannot make professional claims as to the safety or lack thereof of
such products (for human, animal or plant), anyone choosing to use the
products in this manner must assume full responsibility for such use, & we
strongly recommend first researching the matter yourself to ascertain the
degree of safety & risk.
A Word About Roach Foggers
Note: Many will be wary of using commercial
insecticides on an enclosure appliance for fear of harmful residues.
In the foggers I’ve used the
active ingredient is Tetramethrin. It’s been studied thoroughly, & lots
of info. is available on its properties. Its 'claim-to-fame' is its
alleged harmless nature after quick degradation. It degrades in less
than two hours! Consider its aerosol density is 0.05% in a 12x12 room.
In tests on mice, rats, dogs, rabbits, and birds, it’s been found to
render no harm to DNA or chromosomes. In tests ranging from 90 days up
to two years, with direct ingestion rates of 200mg up to 1500 mg a day,
the only significant change was a mild weight loss in tested subjects
over control animals. The same results were confirmed in direct
inhalation tests. In the feeding tests, 95% to 100% percent of the
degraded by-product (oxidized Tetramethrin) was recovered in the feces.
In other words, it passes right through the system. In rabbit eye tests,
96.5% pure doses administered directly in to the eye only created slight
hyperemias. All irritations disappeared within 48 hours. In skin tests
with mammals and birds, once again with 96.5% pure solutions
administered to bare skin there were produced no reactions or allergies
in any of the subjects. Yes, this stuff is toxic to fish in its use
form, but degradation renders it harmless even here.
Bottom line:
Industry tests can't seem to make this stuff harm anything but it's
intended targets. Once introduced into the air it is absolutely
harmless after two hours.
Final Notes: Don't boil the wood to sterilize it; this can harm the
piece (the wood expands when boiled; this can weaken it & open small gaps
letting in more water & hastening decomposition). I also recommend against 'finishing' the wood with any sealant, even
if thought to be aquarium-safe. Let's take an example; Marine Epoxy finish.
Absolutely not. Unless you dip the entire spot, then maybe. There're too many
nooks and crannies in the wood. Every one would have to be
thoroughly filled, otherwise, as soon as any moisture gets beyond
the epoxy seal you'll get fungal growth. It'll be black, very ugly and
trapped. We're not dealing with low moisture content here. The
ever present changes in humidity from the on/off cycle of the
basking light cause a lot more expansion and contraction than
normally experienced. The epoxy will actually cause faster
breakdown of the wood. All of the "clear" coat finishes also have a
fair amount of silica in their make-up and as it breaks down, you'll
be feeding algae their favorite food.
-------------------------------------------------------------------------------
How To Design & Build Your Driftwood
Basking Platform
In the wild there are many variables that impact basking (i.e.: temp.s of the
water & air, time of day, cloud cover, trees & other shading cover, breezes,
constant movement of the sun). We can’t offer this variety in our tanks, only a
largely constant set of theoretically ‘optimal’ conditions with limited variety
(i.e.: the water is heated & the basking lamp on or off). We plunk a chunk of
something in the tank under a light bulb and call it a basking spot. Often the
spots are too small to offer a good range of temp.s for thermo-regulation. It’s
either in the water or on the platform.
What I offer is no perfect solution, but
it gives turtles some place else to go, & even if it’s just 8” away, it
makes a difference. With a well-designed driftwood basking platform you can give
your turtle the choice of varying degrees of warmth without sacrificing swimming
area.
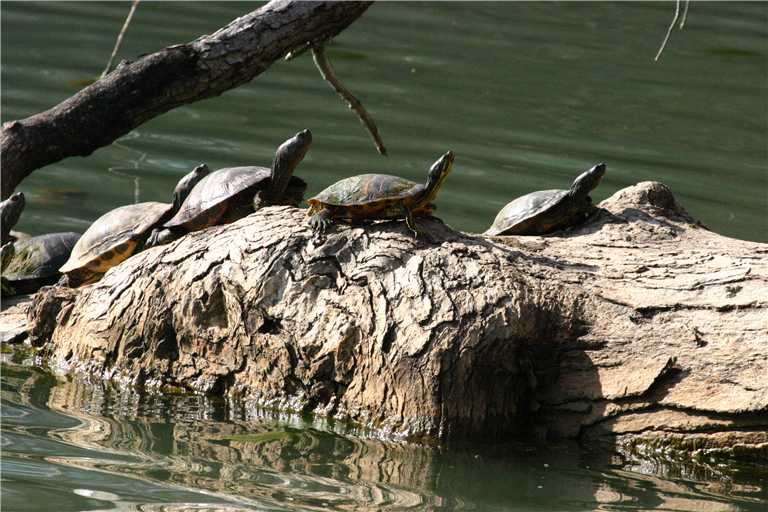
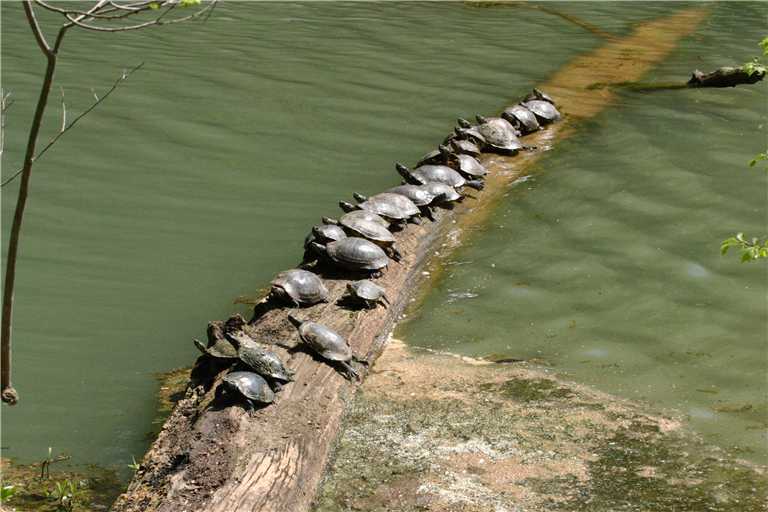
Wild turtles bask on everything
from muddy banks to rocks, but basking species often prefer a tree that has
fallen into the water. The turtles straddle the semi-submerged limbs or rest on
the trunk. Watch long enough & you’ll see them slowly turn themselves against
the sun. They often start out facing the sun to dry off but then turn themselves
to get dry the rear end. A secondary benefit is that most of their plastron is
exposed to the air and also gets dried off. Granted this is just my theory, but
after a few hundred hours of observation, I think I answered my biggest
question. Why do most of the turtles face the same direction basking on a log
and this is my theory.
|
 |
|
Photo by
Richard Lunsford |
|
 |
|
Photo by
Richard Lunsford |
Look closely & you’ll see four turtles on this limb. Now
suspending a limb across the top of your tank in just that perfect way allowing
both access and a way to get fully dry is tricky. But we’ll do our best to
recreate it.
You’ll need enough driftwood to have a vertical post strong
enough to support a horizontal piece about three times the length of your turtle
and at least half its width. For the base, I prefer slate. Flooring slate works
well. It has sufficient thickness to be drilled and hold a screw without
cracking or flaking away. It can be purchased in 12” x 12” squares for just a
few dollars per piece.
The tools involved can be intimidating. I own several power
tools that make this kind of work a snap; you may need to buy or borrow. This
equipment requires skill & if you aren’t familiar with how these tools operate I
suggest you don’t attempt this project. At a minimum you need a good
full-size
hand-saw, better still is a reciprocating saw
& best of all, the ultimate tool for this work is a
band-saw. NEVER ATTEMPT TO CUT ROUND OBJECTS WITH A
CIRCULAR SAW. A CIRCULAR SAW WILL BE OF NO USE WITH THIS PROJECT. A drill
is a must & a free standing drill press is better. You need: Masonry
Drill Bits: 3/16” for the screw shaft
and 3/8” for the screw head. Wood Bits: 1/8” and a
3/8” or a pocket hole bit. Choose screws designed for outdoor use
(the vinyl-coated type is the best). A sharp chisel and lots of 100
grit sandpaper
(a higher-end option would be a motorized sander
(drill-mounted) of some kind (not a grinder); the best
option would be an oscillating spindle sander or a sand-blasting set-up.
Our Equipment List:
1.)
Hand-Saw if not Reciprocating
Saw if not Band-Saw. No circular
saw!
2.)
Power Drill if not a Drill
Press.
3.)
Masonry Drill Bits: 3/16” (for
screw shaft) & 3/8” (for screw
head).
4.)
Wood Bits: 1/8” & 3/8” (or a
pocket hole bit).
5.)
Outdoor screws (ideally
vinyl-coated.
6.)
Sharp Chisel.
7.)
Lots of 100 grit Sandpaper if
not an Oscillating Spindle
Sander or Sand-blasting setup.
Next measure the enclosure to
decide what you need to build.
1)
Measure the
interior length of the tank.
2)
Measure the
interior width of the tank.
3)
Measure the
water line from the bottom of the tank.
This is the most
crucial measurement.
You must establish a
common waterline
because once built, you
don’t want to tear apart the basking platform to
adjust it higher or lower.
4)
Measure where
the basking light is
in relation to the tank.
I find working from the back and the left side is
easiest. E.g. let’s say the light is 10” from the
left and 9” from the back. This is your heat light’s
hotspot. Decide whether you want the basking
platform centered under the hotspot or be off to one
end or the other (this determines the range of
temp.s your turtle is offered).
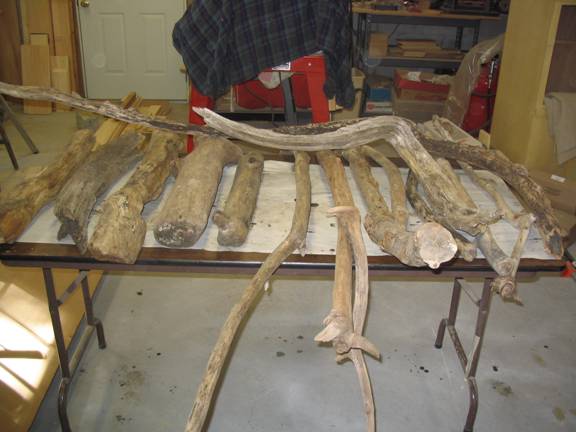
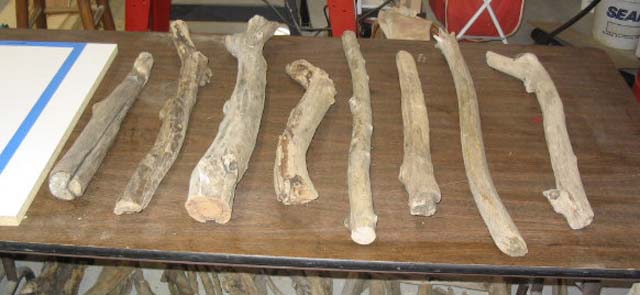
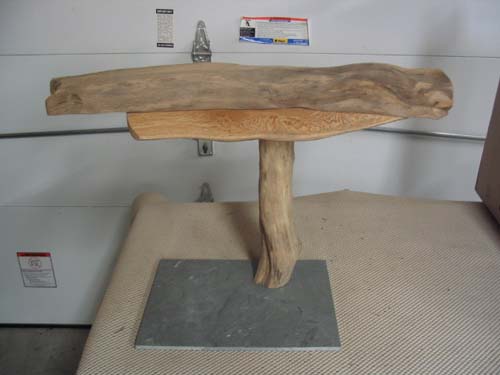
Let’s start with the piece of wood you have chosen
to make the basking platform out of. I start with a handful of pieces to choose
from.
|
 |
|
Photo by Bob
McNally |
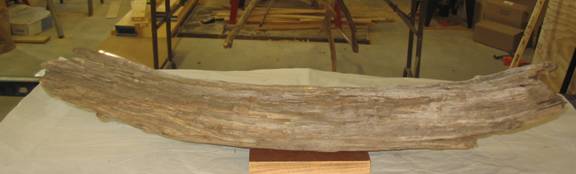
For my example:
The intended turtle is
8” long SCL living in a
150 gallon aquarium. The
basking light is
centered in the tank.
The turtle’s owner also
wants the basking spot
to be centered in the
tank. So, out of the
heavy pieces on the left
I chose this one.
|
 |
|
Photo by Bob
McNally |
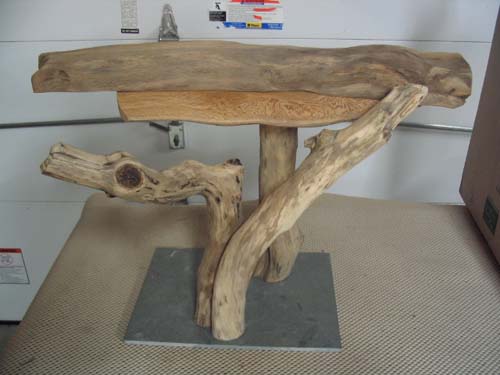
The next choice to make
is the supporting trunk
and any aesthetic
branches you want to
add. I have discovered
that adding branches
that reach just below
the surface afford the
turtles places to cling
to while sleeping at
night. I call these sleeper branches. I
have an array of wood to
choose from in this
picture.
|
 |
|
Photo by Bob
McNally |
Okay, it’s time to get
our hands dirty. First up: take your
chisel and pare away any
and all soft or loose
wood. Scrape away any
bark. When you’re sure
that what’s left is all
solid wood, then sand,
sand, and sand some
more. A minute layer of
the entire old surface
must be removed. In
order to avoid the white
flowing fungus (harmless
but ugly) that manages
to bloom after driftwood
is re-hydrated, you must
either sand or
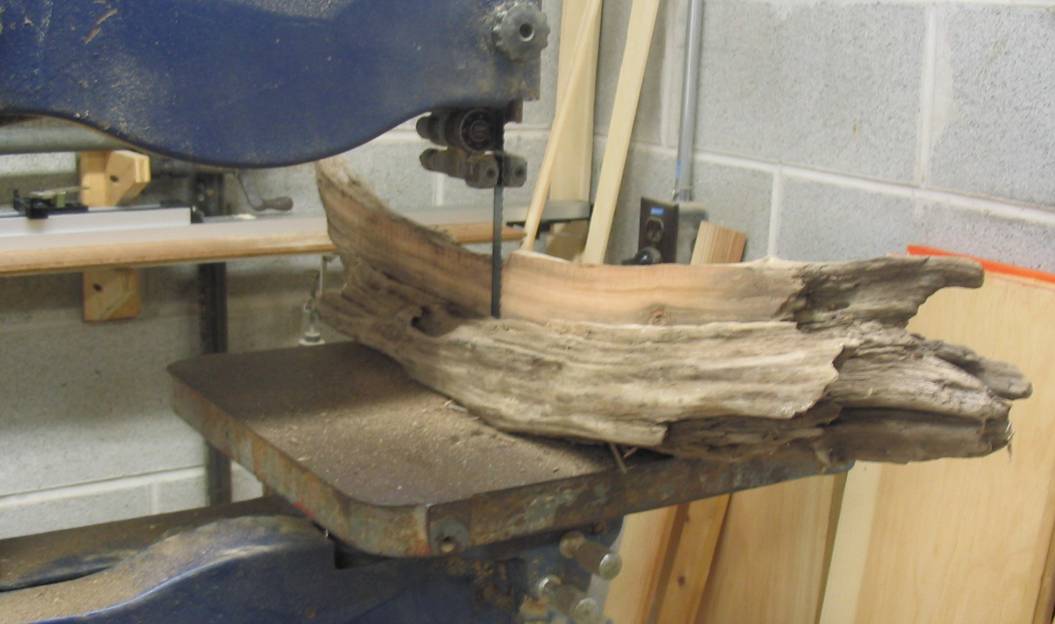
sandblast. Now
we’re ready for the
first cut. In order to
mount the basking spot
on the vertical post, we
need a flat area to
mount it to. This is
where the band-saw comes
in. I cut the log in
half down its length.
 |
|
Photo by Bob
McNally |
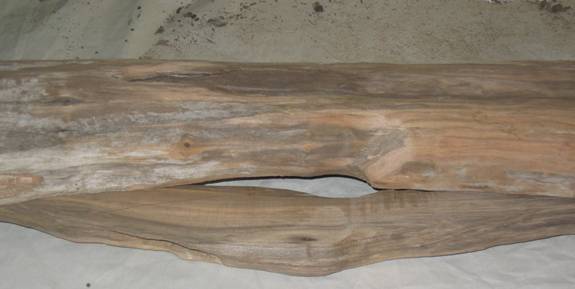
This can also be done by
clamping the log
vertically in a vice and
either hand-sawing the
log down its length or
using a reciprocating
saw. The end result is a
reasonably flat-bottomed
basking platform and the
bonus is…… the cut-off
piece becomes the access step for the
turtle. Whatever way the
log curves, you simply
reverse the direction
with the cut-off piece
like so.
 |
|
Photo by Bob
McNally |
Use
the 1/8” wood bit to
pre-drill and then
secure the step to the
basking spot. Where
the step and the spot
meet is where you want
the waterline to end up
at. This gives the
turtle a submerged area
to climb out on and a
basking spot that
extends high enough out
of the water that it is
always dry (important
for a healthy plastron).
Next up:
Choose your vertical
support pole. Clean it
up like you did the
basking spot. Now let’s
take that waterline
measurement and simply
deduct the thickness of
the base slate. In the
case we’re working on,
the waterline was 21”. I
cut the vertical post to
20.75”.
 |
|
Photo by Bob
McNally |
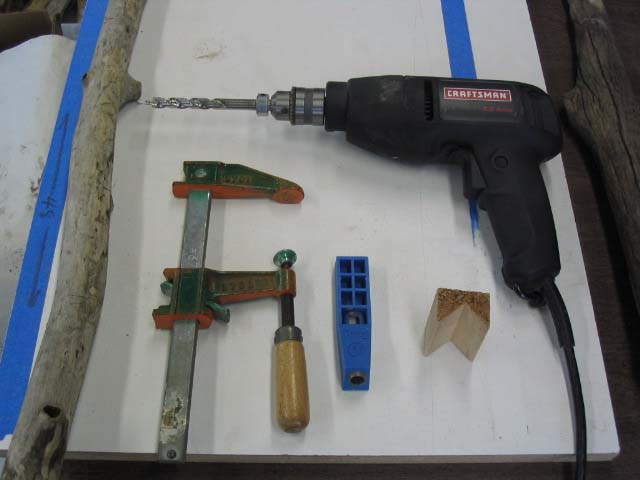
What you see here is the
drill, the specialized
pocket hole drill
bit, pocket hole guide
(blue thing), clamp,
a piece of wood with a
“V” cut into it, and the
supporting log.
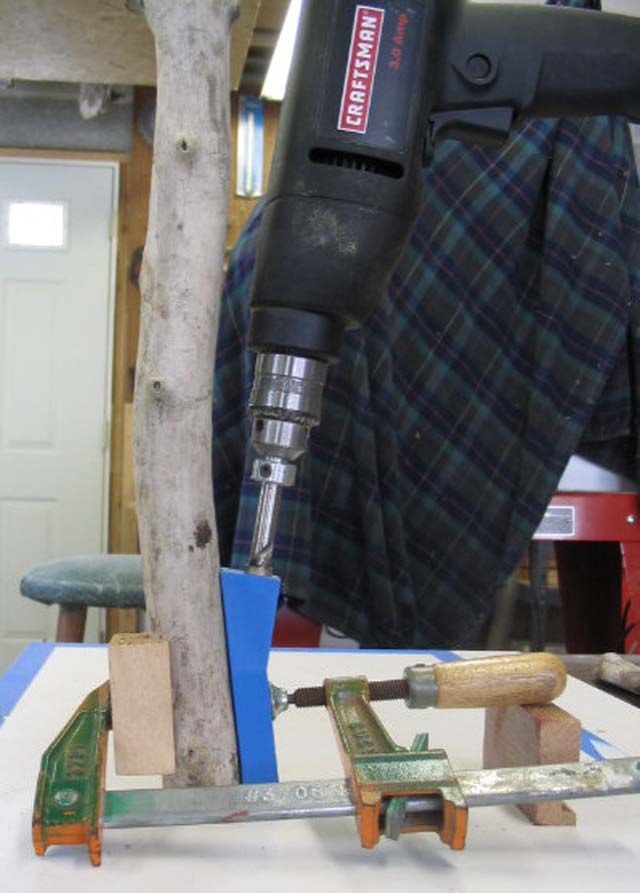 |
|
Photo by Bob
McNally |
This is what it all
looks like when
drilling. The clamp
holds the V and the jig in place on the
round log, while the
two-stage pocket hole
bit drills a pilot
screw-hole at exactly a
15 degree angle. I drill
at least three of these
holes as evenly apart as
my eye can tell around
the top of the trunk.
These angled holes allow
me to screw directly
into the underside of
the basking spot. The
alternative is to drill
down through the top of
the basking spot into
the trunk. That route
requires 3” screws and a
really good eye if you
want to get multiple
screws in place for
rigidity. You can
“eyeball” the angled
holes, but the jig just
makes it so much
simpler.
The next big step
is where and how to
place the vertical post
on the slate base.
 |
|
Photo by Bob
McNally |
The
drill bit on the left is
the 3/16” masonry bit
and the bit on the right
is the 3/8”. The yellow
screw is the vinyl
coated exterior screws
that I use. They’re
about $5 a box.
I place the support pole
on the slate somewhere
near the center and
trace around the trunk
with a pencil. Then it’s
over to the drill press.
 |
|
Photo by Bob
McNally |
You can see the pencil
outline of the trunk.
I’ve drilled the
‘through holes’ with the
1/8” masonry bit from
the top. I then flip the
slate over and change-up
to the 3/8” bit and
countersink the holes.
This gives the
screw-heads a place to
lock in and keeps the
base from wobbling.
Always back the slate up
with a piece of scrap
wood to prevent the
slate from breaking out
when the drill bit comes
through.
 |
|
Photo by Bob
McNally |
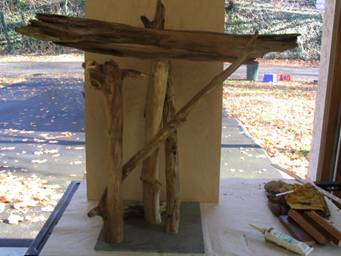
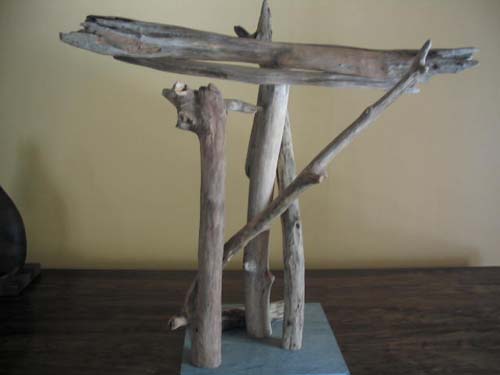
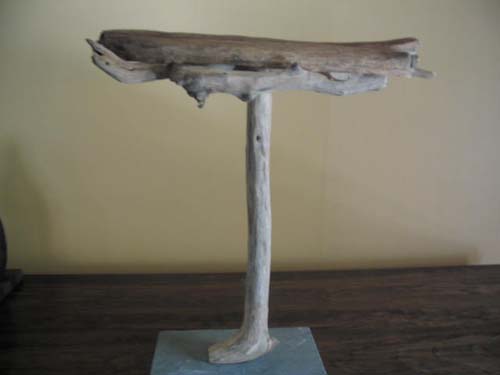
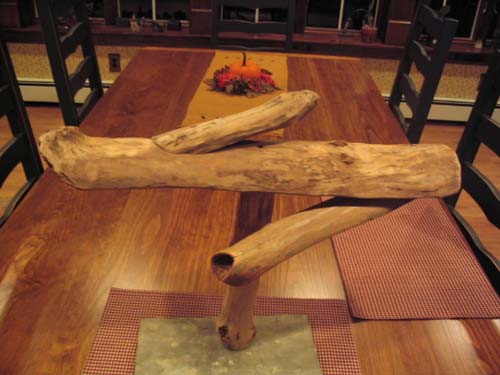
This was the end result
of this project. The
additional trunks are
the sleeper branches I
mentioned earlier. They
are attached to the base
in the same manner as
the support trunk.
Because of the height of
this particular basking
spot I purposely snugged
up the one sleeper
against the back of the
basking platform and
screwed the branch to
the platform for extra
support. Before I do my
final screw tightening,
I apply a thin layer of
aquarium silicone to the
bottoms of any vertical
trunks. It helps keep
the water from wicking
up inside the wood.
You
can expect your basking
spot to last at least
three years. I presently
have two that are that
old and I can tell that
they still have an easy
three more years in
them.
Maintenance:
When I do a total
cleanout, say once every
nine months or so, I
take the platforms into
the shop and scrape away
the algae and snug up
the screws.
Good Luck,
Bob
McNally
Appendix I.) Some
Completed Examples.
Every piece is a unique
piece of artistic
expression, whether you
design an elaborate
piece with several
sleeper branches or a
utilitarian basic
platform. You can aim
for a 'swampy' look or
otherwise customize your
design for a given
effect.
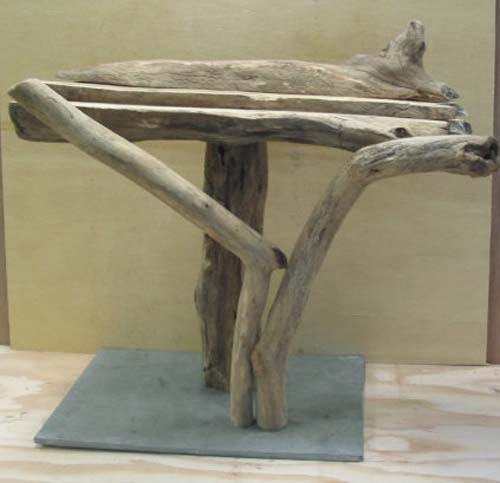
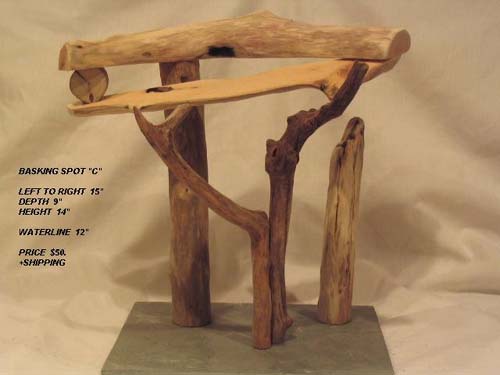
Platform 1. Tuwhada's
Platform.
 |
|
26"
left-to-right,
made for 21"
water-line,
used by 2
RES (8 & 9"
SCL). |
|
Photo by Bob
McNally |
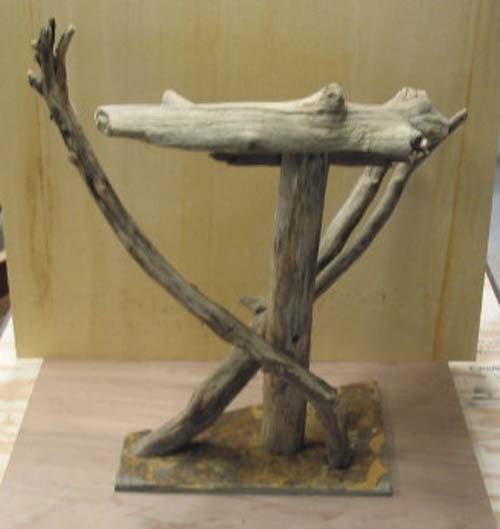
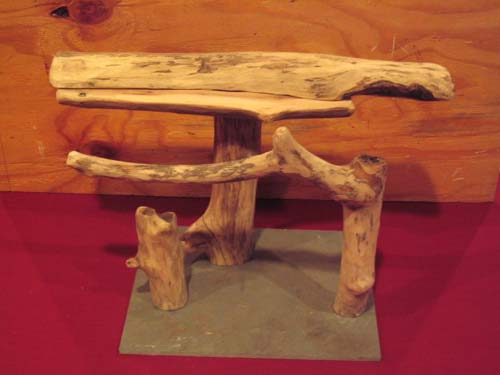
Platform 2. Denise's
Platform.
 |
|
Made for
softshells -
lack of
sleeper
branches to
maximize
unobstructed
swimming
space. |
|
Photo by Bob
McNally |
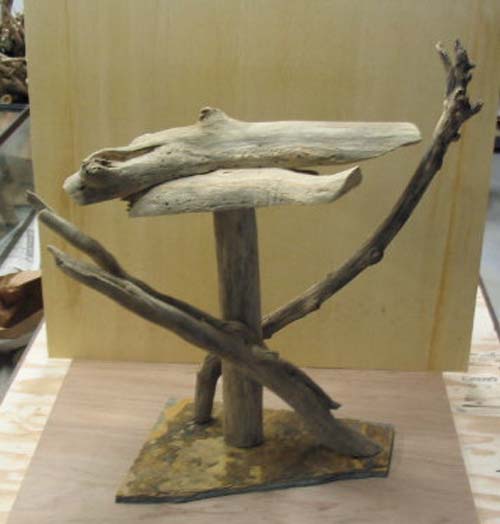
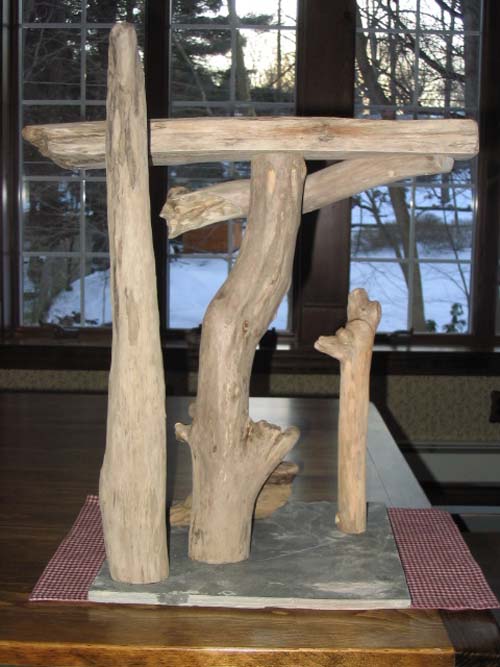
Platform 3. One of
Jan O.'s Platform's.
 |
|
This one has
sleeper
branches & a
balanced
look. |
|
Photo by Bob
McNally |
Platform 4. Lovely
Lisa's Platform.
 |
|
Rear View.
You can 'get
a little
wilder' with
your style. |
|
Photo by Bob
McNally |
 |
|
Front View.
Consider
weight
distribution
when
choosing
your base
slate piece. |
|
Photo by Bob
McNally |
Platform 5. Another
Piece (Owner
Unspecified).
 |
|
There's a
lot of
flexibility
in design. |
|
Photo by Bob
McNally |
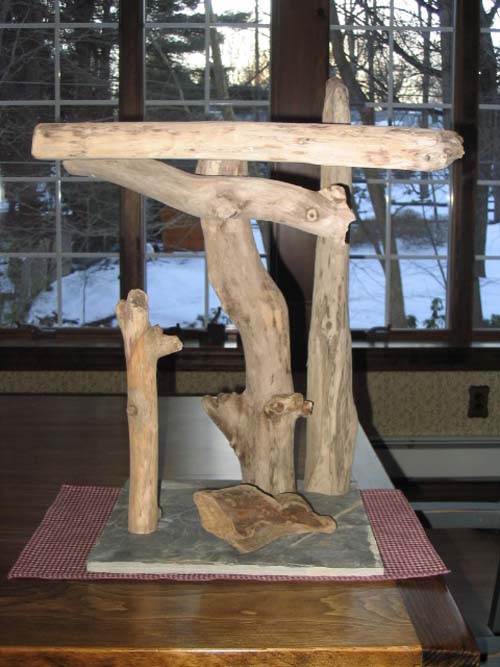
Platform 6. Another
of Jan O.'s Platforms.
 |
|
Note the
balanced,
'little
forest'
look. |
|
Photo by Bob
McNally |
Platform 7. Another
of Jan O.'s Platforms.
 |
|
Another of
Jan O.'s
Platforms. |
|
Photo by Bob
McNally |
Platform 8. Another
Piece (Owner
Unspecified).
 |
|
Note the
extended
length sleep
branch on
this piece. |
|
Photo by Bob
McNally |
Platform 9. Lynn's
Platform.
 |
|
Front View.
Designing
larger
platforms
for deeper
water setups
gives you
more room to
design
striking
pieces. |
|
Photo by Bob
McNally |
 |
|
Rear View.
You can use
short,
'bottom'
pieces to
make a more
naturalistic
floor
terrain. |
|
Photo by Bob
McNally |
latform 10. Unusual
Platform Project - Owner
Unspecified.
 |
|
This
platform was
designed for
a long, thin
tank with
non-centered
lighting.
The highest
point is
beneath
the
off-center
basking
light. This
is the basic
main basking
platform. |
|
Photo by Bob
McNally |
 |
|
You can clearly
see how much
sleeper branches
add to a
platform, both
for the turtles'
comfort & your
tank's aesthetic
look. |
|
Photo by Bob
McNally |
 |
|
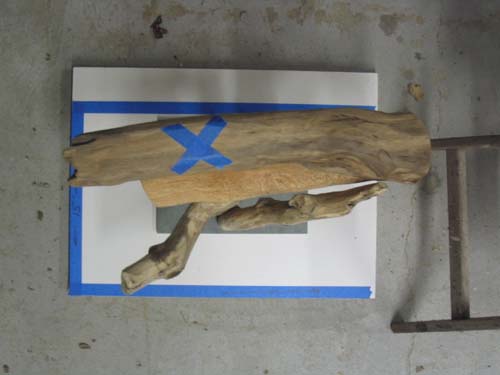
Planning:
The 'X' is
where the
basking
light shines
down & the
blue
rectangle
the tank
wall
perimeter. With
the basking
platform
against the
back of the
tank you
must be sure
your turtle
can't stand
on it, grab
the tank's
top rim &
escape! |
|
Photo by Bob
McNally |
|